STEP
BY STEP: “YOU’RE INVITED”
Materials:
a. stamp of invitation’s information (I used a
6”x 6” Art Mounted stamp from RubberStamps.net)
Optional: smaller stamp of return address ( I
used a 3”x1”)
b. Powerpoint in Microsoft Office
c. invite paper (to stamp on) * I used
LCIPaper.com
d. envelopes that fit your invite paper *I used
JAMPaper.com
e. embossing powder (1 small jar should be fine)
*I mixed clear, dark brown, and copper for a textured metallic effect
(Michael’s has the best)
f. dark ink (i used the refills from Office Max)
and an ink brayer (roller) and clear if you want to do the optional steps!
g. catch trays (I used Martha Stewart’s Glitter
Trays). You will need at least 3 or 4
h. funnel tray (to funnel the unused embossing
powder back into the container)
j. heating tool ($30 at Michael’s)
k. dropcloth (the powder can find any crevice to
hide in!)
l. table/corner to keep all of the above set up
until all the invitations are made!
STEP 1: Go into PowerPoint
and start a new slide. Use the fonts and spacing you want to design your
invitation. Take a screen shot (on a Mac, press Command, Shift, and 4
simultaneously). See Picture.
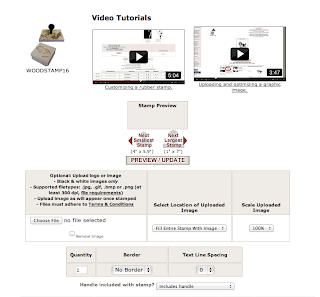
STEP 2: Go online to RubberStamps.net and select “Art Mounted Stamps”. I chose 6’’x 6’’ for my stamp. Upload the screen shot you took of your invitation and confirm that it looks correct. Buy your stamp!

paper company (I used LCIPaper.com) and choose your paper. See pictures.
Make sure you check the measurements of the stamp vs. the paper! Order your
paper!
STEP 4: Sometimes
the paper you choose will be paired with a matching envelope. If you like what
it comes with, order those as well. BUT if you don’t like what it comes with
(like me), go seek out some cheaper options! I used JAMpaper.com (see picture)
and found dark brown envelopes. Again, make sure to know the EXACT MEASUREMENTS
of your invite in order to select the appropriate size envelope. Don’t guess!
Order your envelopes
***REMEMBER TO
ORDER MORE THAN YOU INTEND TO SEND
OUT. IT’S BETTER TO HAVE AT LEAST 10-20 TO MESS UP ON! J OR MORE IF YOU WANT TO MAKE SURE TO MAKE
SOME FOR YOURSELF AS KEEPSAKES!
STEP 5: Retrieve
the embossing powder, heating tool, trays, ink, ink brayer, stamp, and paper
and set up your assembly line.
* I mixed a few embossing powders to make a textured metallic look, so I put my mixture into a small “dressing-size” Tupperware container.
STEP 6: Roll the
ink with the ink brayer onto the stamp and position the stamp in the spot you
want on the paper. Press down evenly and remove the stamp. The amount of ink is
something you will need to play with on some scratch paper as too much can make
your invite less readable. Also, I had to use some cardboard to calibrate
exactly where I needed to put the stamp for it to stamp the area I wanted on
the invite.
STEP 7:
Immediately pour embossing powder all over the inked parts of the paper. Don’t
worry about using too much. Wherever the ink is NOT, it will fall off and be
reusable.
STEP 8: Pour the
excess powder into the “excess tray” or a tray you designate for that purpose.
Place the invite into the last empty tray.
STEP 9: Use your heating tool to heat the powder on the ink…that’s all there is to embossing! Make sure to keep the heating tool moving so you don’t burn the paper (it won’t necessarily catch it on fire but it will discolor it a little). After you have embossed the entire stamp, put the invitation aside to dry.
STEP 10: Repeat to finish all your invitations!
OPTIONAL STEPS:
Now that you know how to emboss, you can order a stamp with your return address
and emboss the backs of your envelopes. Because I used a dark envelope, I
decided on clear embossing ink (from Michaels) and clear embossing powder (also
from Michaels). Repeat the same steps above to get your personalized envelopes!
Thanks for checking out our blog! Remember you can go to our youtube to see this craft in action!
And don't forget about our Facebook:
Our Twitter:
Our Email:
and
Our Pinterest:
Love,
The Attempters


No comments:
Post a Comment